It's been a while since I've posted a Favorite Thing, but when I saw this gorgeous knit-themed cake on the Knit & Crochet Now Facebook page, I knew I had to share it both on my Facebook page and here with you as well! This cable knit frosted cake would be fantastic for any wedding, birthday, knitting group party or other special event.
Showing posts with label cables. Show all posts
Thursday, April 24, 2014
Favorite Thing - Knitting Cake
It's been a while since I've posted a Favorite Thing, but when I saw this gorgeous knit-themed cake on the Knit & Crochet Now Facebook page, I knew I had to share it both on my Facebook page and here with you as well! This cable knit frosted cake would be fantastic for any wedding, birthday, knitting group party or other special event.
Saturday, February 8, 2014
Ballymeade Boot Toppers - New Knitting Pattern
Did I mention I have a new pattern out? It's true! I'd committed to let a local yarn shop have exclusive first dibs on the pattern for their accessory knitting club for the month of December, but the Ballymeade Boot Toppers finally made their official, public debut in January.
I toyed with adding a few other twists or cables, but decided to keep the design simple and easy for newer cable knitters.
I love how boot toppers provide a stylish look without the discomfort of sweaty feet, or a snug fit, from wearing full-foot socks inside dressy boots. And the fact that they knit up quickly (from just one skein of Cascade 220) makes me happy too.
Being an eclectic kind of girl, I had a really hard time deciding which photos to use, but finally opted to use photos of both the casual and dressy styling (it might be that little touch of Libra in me, haha).
I am so happy to finally be able to share Ballymeade here. Bringing this pattern to publication, along with everything else in my life, has been a real challenge for reasons I won't get into in this post, but will share soon. And many, many thanks to the awesome Josefina, Laurie, Connie and Julia for offering to test knit these for me.
I hope everyone is staying warm and safe during the extremely cold temperatures occurring throughout the US and other corners of the world. Thanks for stopping by my studio today, happy stitching!
Labels:
Ballymeade,
boot toppers,
cables,
knitting,
pattern,
ribbing
Wednesday, September 26, 2012
Sarah's Beautiful Bosc Scarf
It's impossible to keep up with most of the projects knit from my patterns that get posted on Ravelry but every now and then I get a chance to peruse the latest project posts in my designs.
This is how I recently happened across a lovely version of my Bosc Scarf pattern by Sarah Owens of the Yarnie Me blog aka Sarahsplace on Ravelry.
In her blog post and Ravelry project notes, Sarah mentions that she is a newer lace knitter - wow! I would never have guessed it if she didn't say so.
One of my favorite things about the Bosc Scarf and Hat designs is that the cable and lace stitches are really very simple to knit but produce a result that looks impressive. Some of my test knitters even referred to it as 'potato chip' knitting because they just wanted to keep going! Yum, potato chips...
And speaking of yummy, Sarah knit her scarf in Malabrigo Merino Worsted in a delicious natural creamy color. Her scarf looks so pretty and cozy that I just want to curl up in it.
Congratulations Sarah, on doing such a beautiful job, and thanks for the nice project post.
I wish I knew about all the lovely projects in my designs that are posted on blogs or mentioned on podcasts, so if you do one of your own, or come across a mention on the internet, I'd be so appreciative if you dropped me a note so I can check it out. Whether you are new like Sarah, or more experienced, my readers are all super nice people and so very talented. I love to show off the gorgeous things you make, so please don't be shy!
Amethiste Pattern Giveaway
There's still time to enter the drawing to win one of 3 free Amethiste shawl PDF patterns in my giveaway contest!
Details are outlined in this post.
In another post soon, I plan to share a few of the beautiful Amethiste's already made by readers, including some by my talented test knitters.
That's it for today, peace blessings and much happy knitting to you!
Friday, February 3, 2012
Have a Heart - Valentine Knits & More
photo Interweave Press
Of course, there's always traditional paper cards, but for fiber enthusiasts, the options are so much more plentiful. Whether you want to make a valentine for a loved-one or just a little treat for yourself, you might consider some of these cute patterns.
The Felted Heart Milagros by Mags Kandis (shown in photo above) would make nice sachets for a yarn stash or dresser drawer if stuffed with fragrant, moth-repellant herbs.
Garter stitch hearts with tiny messages, from Flax & Twine are delightful. photo Flaxandtwine.com
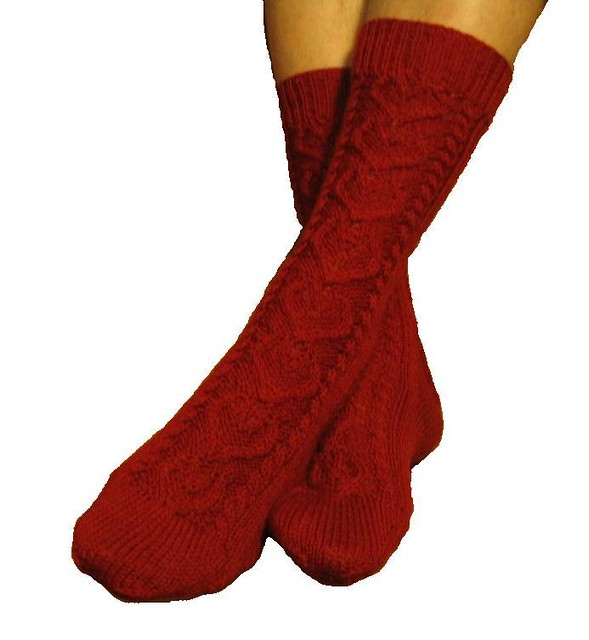
The heart cables in Melissa Morgan Oakes' Be Mine sock pattern, knit in a favorite color, would be a fun secret love token for your sweetie. photo Ravelry.com
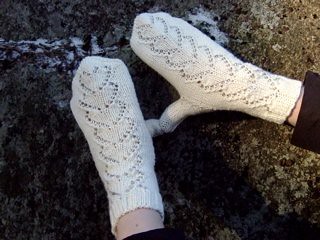
If you like lace, the Heart of Winter mittens by Lalla Pohjanpalomight might be just your thing. photo Ravelry.com
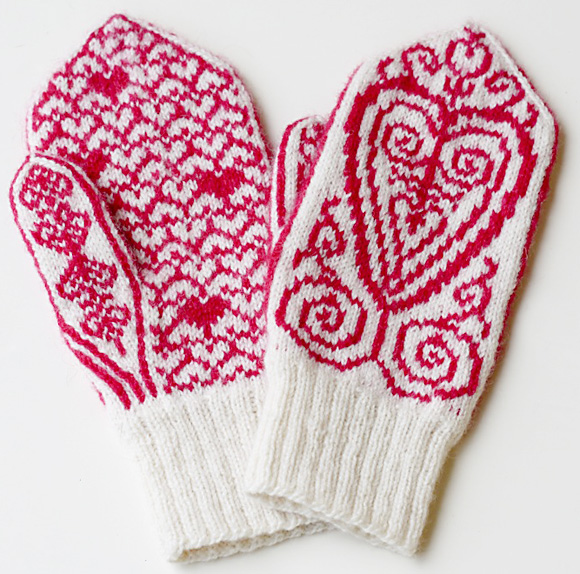
Stranded knitting lovers should check out the new Knitty Winter Bis issue that includes the Freja mitten pattern by Emmy Petersson. photo Knitty.com
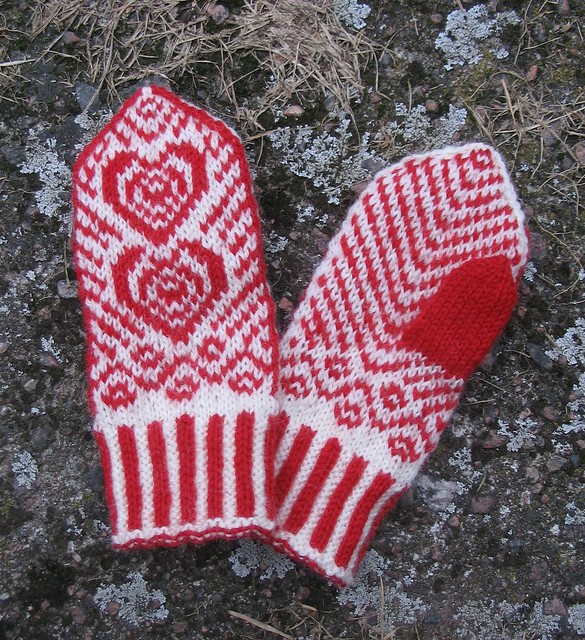
For smaller hands, you might like Babyvotter by Lilia Mankk. photo Ravelry.com
Crocheters may wish to try their hooks on this Love Hearts pattern by June Gilbank; stitching two together back-to-back would make a simple sachet. photo Ravelry.com
If you want to make a small item but are short on time, this stitchy card tutorial from Red Bird Crafts is fast, easy and makes use of yarn scraps (always a good thing!). It's also a fun craft for kids. photo Redbirdcrafts.com
There are so many creative ways to make valentines, I may try to share a few more before Valentine's Day. But why wait until a special day to tell someone you love them anyway? Today is a great day to do pick up the phone, send a text, an email or a note, or give a hug to a lover, friend, family member or pet. It only takes a moment but the effects linger.
And don't forget about my giveaway contest that ends on February 14th, details to enter can be found here.
That's it for now, thanks for stopping by and happy stitching!
Monday, December 12, 2011
New Bosc Scarf Knitting Pattern & Recipe
I've long been intrigued with the idea of trying to capture the delicate beauty and intricacy of Japanese-style knitting stitches in a simple, approachable way. A way that would be fun for experienced and newer knitters alike, especially those who love the look of these types of stitches but are perhaps a little unsure of trying something that may appear rather scary.
With this technical concept in mind, the idea for the design of my newest knitting pattern was begun, aesthetically inspired by the beauty of ripe pears, the most elegant of which, in my opinion, are the Bosc variety.
I love their gold, green and russet hues, graceful curving shapes, and sweet but subtle flavor.
When I found Quince and Co. Lark worsted weight yarn and saw the rich "honey" colorway I knew I had a match for my project.
The 100% wool yarn is soft enough for a scarf, with excellent drape for a yarn of this sort, but the twist still has a nice amount of body to give structure to the stitch pattern and to the scarf itself as it drapes around the neck - all details that were important to me as I selected yarn for this design, the Bosc Scarf, available here on my blog or on my designer page at Ravelry.com.
The scarf's texture is created with very basic stitches. Simple increases and decreases as well as easy cables shape the lines into a semblance of a pear shape and leaves (although you might very well see tulips and that is OK too!), separated by vertical lines of rippling eyelets.
I knit all of the cables without a cable needle; many excellent videos and tutorials for this technique can be found on Youtube or in this video from Knittinghelp.com or on the Grumperina.com or Knitting Daily websites.
Lace ends grow organically into and out of Bosc's main stitch pattern, so the project is knit straight through from cast on to bind off with no grafting or provisional cast on necessary. The ends can be blocked either straight across or into a scalloped shape as I have done in the example here.
A sleek corded edge is built into the knitting by slipping stitches as you go. This small detail keeps an elaborate stitch combination modern and un-cluttered (I love lace and cables but wanted to avoid a fussy look).
Large charts as well as written instructions are included, and tips for adapting the length are given, offering multiple options for knitters.
The entire project began late last summer just as the pears were coming into season and I began experimenting with recipes for this fruit. Bosc pears are excellent for cooking as they retain much of their shape and flavor when baked or poached, although many other varieties cook nicely as well.
One of my favorite pear dishes poaches the fruit in champagne with vanilla, and I hope you will give them a try and see just how lovely they can be.
Champagne Poached Vanilla Pears
Ingredients
1 bottle champagne (any sparkling wine will suffice, or non-alcoholic version if you prefer)
1 cup sugar (or sugar substitute)
1/4 tsp. lemon zest
1 4" vanilla bean - split lengthwise
2 firm Bosc pears - peeled but with stems intact (slightly underripe is ideal)
Optional garnishes - dark chocolate, star anise, bay leaves
Directions
In a saucepan just large enough to hold pears and liquid, combine first four ingredients. Bring to a boil, immediately reduce to a simmer. Gently lower pears into the simmering liquid until fully submerged.
Cover pan and simmer for 15 minutes, baste with liquid occasionally, avoid stirring. Finished pears should be tender and easily pierced with a fork; very firm pears may need up to an additional 5-15 minutes of cooking time. Allow to cool in liquid for at least 20-30 minutes before serving.
Pears may be served immediately, or wrapped tightly and stored in the refrigerator for up to three days. To serve, place a single pear upright on a small plate, spoon a small amount of liquid over pear. I love to garnish these pears with small squares of extra dark chocolate, or for a festive look try adding a star anise and a single bay leaf, if desired.
| I hope you enjoy making this recipe, it is a light, but delicious, dish to keep in mind with Christmas and New Year's celebrations approaching. If you decide to make either the scarf or the pears, I'd love to know! Bon appétit and happy knitting! | ||
Labels:
Bosc,
cables,
FO,
lace,
Lark,
pattern,
Quince and Co.,
review,
scarf,
stitch patterns,
Vanilla Champagne Pears
Tuesday, August 2, 2011
Inspiration - Knits on the 'Net
I love unique and inspirational personal style, and Thesartorialist.com always presents some really intriguing images.
A simple, asymmetric look.
Interesting stranded stitchwork jacket.
I like this reconstructed one too.
The Sartorialist has a brand new website, packed with more style inspiration from around the world (the source of these photos and much more). Enjoy, and happy knitting everyone!
Sunday, December 12, 2010
Knitting on the Road FO: Legwarmers, and a Holiday Recipe
Yesterday we drove about 2 hours north to Akron to tour Stan Hywet Hall. Contrary to popular belief, this mansion was not built by a guy named Stan.
'Stan Hywet' is Old English for stone quarry, and this grand home was built by Goodyear Tire and Rubber Company founder F.A. Seiberling, beginning in 1912.
No photos may be taken indoors, but you get an idea from the outside what an interesting place this is to visit.
The house, outbuildings, conservatory/ butterfly house and grounds are spectacular and the snowy setting was picturesque. The Christmas decorations are looking a little worn around the edges, but the home itself is worth seeing.
As I pondered a knitting project for the above-mentioned road trip I suddenly had a mad desire to knit something cabley.
I started and finished a little pair of legwarmers during the drive up and back, thinking they'd be a great extra cozy layer on a cold winter day.
Little did I know how handy they would be today as we went out to shoot photos for my upcoming Lingonberry Loop pattern.
I've had cables on the brain lately as I ponder knitting several cable projects, some for publication next year. I think all this snow may have had something to do with my sudden desire for some cable knitting too!
And what fun the snow has (mostly) been. My little fur girl loves to play in the snow.
Well, she just loves to play, period. But watching her enjoy snow is such fun.
Pomeranians were bred down from sled dogs, and a love of winter weather obviously runs in her blood.
The rest of today was a good one to stay indoors with a cup of hot tea, knitting and cooking. My friend Cheryl is a big fan of Oreos, so I whipped up some of the easiest 'truffles' ever, using - don't laugh! - Oreo cookies.
These cookie bonbons are creamy with that distinctive Oreo flavor American readers might remember from childhood.
Food processor-crushed cookies are blended with cream cheese to form a dough for rolling into balls and dipping in melted chocolate. So simple, so nostalgic, so tasty.
Oreo Truffles Recipe
Recipe Notes
- Don't be tempted to use store-brand cookies unless you've compared them to Oreos. The only store-brand cookies I've found that taste remotely as good in this recipe as the real thing is Trader Joe's brand.
- Be sure to use at least 20 oz. of cookies or your dough will be too soft.
- If garnishing with crushed peppermint, crush the candies very finely to avoid cracking a tooth!
Makes approximately 3 dozen truffles, depending on size.
Ingredients:
20 oz. package Oreo cookies (not "Double Stuff")
For peppermint variation: 20 oz. peppermint-filled Oreos (if you cannot find peppermint cookies, use regular cookies and add 1/2 tsp. pure peppermint extract)
8 oz. cream cheese, at room temperature
16 oz. dark chocolate, chopped, or use chips
Optional garnishes as desired, such as pure cocoa powder, crushed peppermint candies, shaved chocolate, colored sanding sugar or melted white chocolate drizzle.
Directions:
In the bowl of a food processor, crush cookies to fine crumbs. Add cream cheese and process until completely blended with no white showing. The dough should be slightly sticky but firm. If it's very wet, the truffles will be too soft so add pure cocoa powder in tablespoons until it is firm enough to hold shape when rolled into walnut-sized balls in the palm of your hand.
Roll small chunks of dough into balls and place on a pan that will fit in your refrigerator. Refrigerate at least one hour or until firm.
Spread parchment or waxed paper on counter surface.
Heat chocolate in a completely dry glass bowl in microwave, stirring every 45 seconds, until melted. Even a small amount of moisture from your hands, a spoon, etc. can ruin your chocolate. Do not overheat.
Remove truffle balls from refrigerator. Using two forks or small tongs, dip balls into melted chocolate until completely covered, allow to drip over container for a moment, then place on paper. Every 10 balls or so, sprinkle with garnishes.
When the coating is completely solid, layer the candies with parchment or waxed paper in a storage container. Store different flavors separately or they will all end up tasting like peppermint. Keep in refrigerator until ready to serve, best if used within one week.
Enjoy!
20 oz. package Oreo cookies (not "Double Stuff")
For peppermint variation: 20 oz. peppermint-filled Oreos (if you cannot find peppermint cookies, use regular cookies and add 1/2 tsp. pure peppermint extract)
8 oz. cream cheese, at room temperature
16 oz. dark chocolate, chopped, or use chips
Optional garnishes as desired, such as pure cocoa powder, crushed peppermint candies, shaved chocolate, colored sanding sugar or melted white chocolate drizzle.
Directions:
In the bowl of a food processor, crush cookies to fine crumbs. Add cream cheese and process until completely blended with no white showing. The dough should be slightly sticky but firm. If it's very wet, the truffles will be too soft so add pure cocoa powder in tablespoons until it is firm enough to hold shape when rolled into walnut-sized balls in the palm of your hand.
Roll small chunks of dough into balls and place on a pan that will fit in your refrigerator. Refrigerate at least one hour or until firm.
Spread parchment or waxed paper on counter surface.
Heat chocolate in a completely dry glass bowl in microwave, stirring every 45 seconds, until melted. Even a small amount of moisture from your hands, a spoon, etc. can ruin your chocolate. Do not overheat.
Remove truffle balls from refrigerator. Using two forks or small tongs, dip balls into melted chocolate until completely covered, allow to drip over container for a moment, then place on paper. Every 10 balls or so, sprinkle with garnishes.
When the coating is completely solid, layer the candies with parchment or waxed paper in a storage container. Store different flavors separately or they will all end up tasting like peppermint. Keep in refrigerator until ready to serve, best if used within one week.
Enjoy!
Labels:
cables,
Christmas,
cookies,
dog,
FO,
legwarmers,
Oreos,
recipe,
road trip,
Snow,
Stan Hywet,
truffles
Subscribe to:
Posts (Atom)